Multi-node support for Polling Tentacles is available from Octopus Server 2026.4.6909. On older versions, poll every node instead.
In an Octopus High Availability (HA) cluster, a Polling Tentacle normally has to poll every Octopus Server node. Work for a Tentacle is queued in memory on the node that runs the task, and only that node can hand it to the Tentacle. So each Tentacle needs a unique address or port for every node, and you need to update every Tentacle when you add or remove a node.
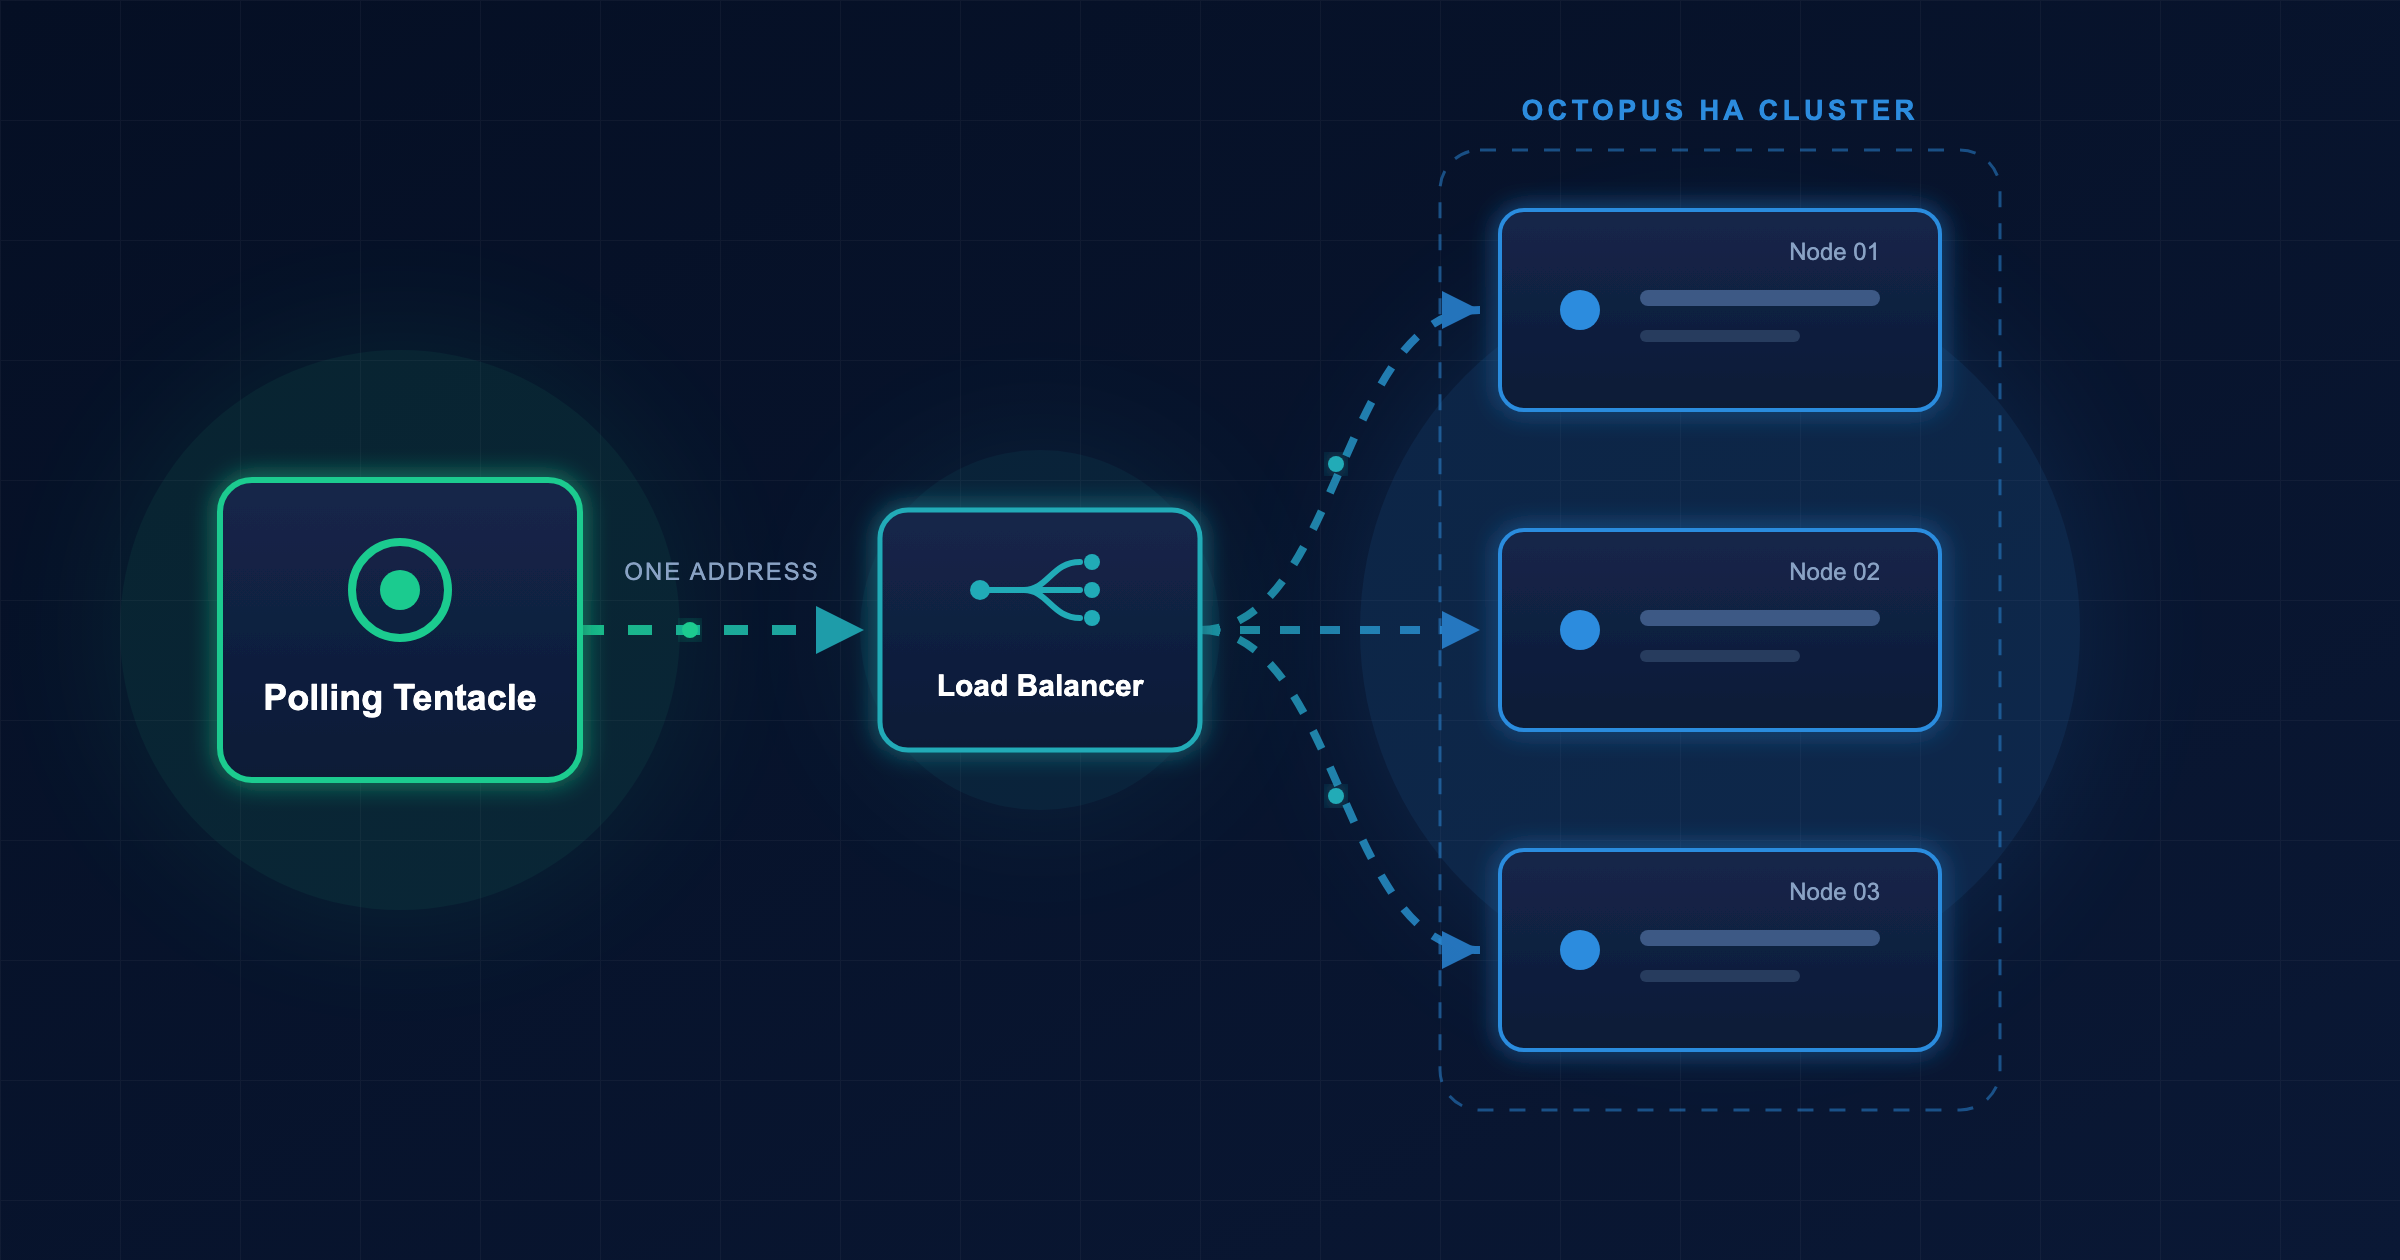
Multi-node support for Polling Tentacles removes that restriction. The nodes share a pending request queue stored in Redis, so a request queued by any node can be collected by whichever node the Tentacle is connected to. Each Tentacle only needs to poll a single address, which a load balancer spreads across all the nodes.
Requirements
To use multi-node support for Polling Tentacles, you need:
- An Octopus HA cluster where every node runs a version of Octopus Server that supports the feature.
- A Redis instance that every node can reach, configured the way Octopus needs.
- A cluster shared directory on storage every node can read and write.
- A TCP load balancer in front of the nodes’ Polling Tentacle port (
10943by default).
Redis requirements
We recommend Redis 8.0 or later. Earlier versions may work, but we have not tested them.
Octopus uses Redis as a short-lived queue, not a database. Redis must hold data in memory only:
- Turn off persistence. Do not use RDB snapshots or AOF.
- Do not use replication or automatic failover. Replication is asynchronous, so a promoted replica can bring back requests that a node has already collected, and they would be sent to the Tentacle again.
- Set the eviction policy to
noeviction
Partial or historical restores of Redis data can cause repeated requests or undefined behavior. If Redis restarts, Octopus detects it and retries communication with the Tentacle, as set in the Recover from communication errors with Tentacle section of the machine policy. These retries stop deployments from failing when Redis is temporarily unavailable.
Running Redis
A single Redis node started with these options meets the requirements:
redis-server --save "" --appendonly no --maxmemory-policy noeviction --requirepass "your-secret-password"You can also use the sample redis.conf used in testing. To run with it in Docker, follow the Running Redis locally guide in the Halibut documentation. For Kubernetes, we recommend the Helm chart.
If you use a managed Redis service, choose a tier or configuration without persistence and replicas, and set the eviction policy to noeviction.
Cluster shared directory requirement
Octopus shares larger files between nodes by writing them to the DataStreams folder in the cluster shared directory. How you set the cluster shared directory depends on your installation type. See Turn on multi-node support for Polling Tentacles.
To keep this transient data on separate storage, such as faster storage that does not need to be backed up, set an executions cluster shared directory. Octopus then stores all transient execution data in that directory, including the data sent to Polling Tentacles.
For guidance on what storage to use, see file storage in our high availability best practices.
Load balancer
Put a load balancer in front of the Polling Tentacle port on every node that processes tasks. The load balancer must:
- Pass TCP traffic straight through. Octopus terminates TLS and authenticates Tentacles with certificates, so the load balancer must not terminate TLS.
- Route to every node that processes tasks. You do not need to include UI-only nodes.
You do not need session affinity. Any node can serve any Tentacle.
Turn on multi-node support for Polling Tentacles
Configuring a Redis connection string enables multi-node support for Polling Tentacles; removing it disables it. Configure every node in the cluster with the same connection string.
The value is a StackExchange.Redis connection string, for example:
your-redis-host:6380,password=your-secret-password,ssl=trueWindows and Linux servers
-
Configure the cluster shared directory with the path command:
PowerShellOctopus.Server.exe path --instance="OctopusServer" --clusterShared \\OctoShared\OctopusDataTo store transient data that does not need to be backed up in a different location, also run:
PowerShellOctopus.Server.exe path --instance="OctopusServer" --executionsClusterShared \\OctoShared\OctopusTransientDataIf you have already set specific paths, such as
TaskLogsorArtifacts, setting the cluster shared directory does not change them. -
On each node, configure the Redis connection string.
You can set the connection string in any of the following ways. If more than one is set, the environment variable takes precedence over the configuration file.
Method Name Command line Octopus.Server configure --multiNodePollingTentaclesRedisConnectionString="<connection string>" Environment variable OCTOPUS_MULTI_NODE_POLLING_TENTACLES_REDIS_CONNECTION_STRINGServer configuration file key Octopus.Communications .MultiNodePollingTentaclesRedisConnectionString For example, to set the Redis connection string using the command line, run the configure command:
PowerShellOctopus.Server.exe configure --instance="OctopusServer" --multiNodePollingTentaclesRedisConnectionString="your-redis-host:6380,password=your-secret-password,ssl=true"The command checks that the connection string is valid before saving it. The value is treated as sensitive, so it is masked in the command’s output.
-
Restart each node. The setting takes effect when Octopus Server starts.
Octopus Server Linux container
Set these environment variables on every Octopus Server container:
| Name | Value |
|---|---|
OCTOPUS_MULTI_NODE_POLLING_TENTACLES_REDIS_CONNECTION_STRING |
Your Redis connection string. |
CLUSTER_SHARED_MODE |
New installation: CLUSTER_SHAREDExisting installation: SEPARATE_VOLUMES_WITH_CLUSTER_SHARED, which keeps your existing volumes. |
Then mount /clusterShared on storage so that every node can read and write.
To store transient data that does not need to be backed up in a different location, also set the environment variable USE_EXECUTIONS_CLUSTER_SHARED to True and mount the /executionsClusterShared path as well. See cluster shared configuration for what each CLUSTER_SHARED_MODE value does.
Helm chart
The Octopus Deploy Helm chart can configure multi-node support for Polling Tentacles, the cluster shared volume, and the load balancer for you. It can also run Redis in your cluster, configured to meet the Redis requirements:
octopus:
  clusterShared:
    mode: CLUSTER_SHARED # To let Octopus read existing data, existing installations should use SEPARATE_VOLUMES_WITH_CLUSTER_SHARED.
  multiNodePollingTentacles:
    enabled: true
redis:
enabled: trueThis example uses CLUSTER_SHARED, which stores everything in a single cluster shared volume. See cluster shared configuration.
If you are upgrading an existing installation that does not already have octopus set, use SEPARATE_VOLUMES_WITH_CLUSTER_SHARED so Octopus continues using your existing volumes.
The in-cluster Redis is a single pod. If it restarts, Octopus retries in-flight requests as configured in the machine policy, and new requests work again once it is back up.
By default, the in-cluster Redis has no memory limit, so the noeviction policy never applies and Redis can grow until the pod runs out of memory and restarts. Set redis, for example, to 800mb. When Redis reaches it, new requests are rejected instead of queued requests being evicted. If you also set a memory limit in redis, set redis below it.
To use your own Redis instead, provide the connection string:
octopus:
  clusterShared:
    mode: CLUSTER_SHARED # To let Octopus read existing data, existing installations should use SEPARATE_VOLUMES_WITH_CLUSTER_SHARED.
  multiNodePollingTentacles:
    enabled: true
    redis:
connectionString: "your-redis-host:6380,password=your-secret-password,ssl=true"This setting is under octopus, not the top-level redis key, which only controls the in-cluster Redis. Leave redis set to false. If it is true, the chart ignores your connection string and uses the in-cluster Redis.
The chart will not render if multi-node support for Polling Tentacles is on but octopus is not set, or if there is neither an in-cluster Redis nor a connection string.
When the feature is on, the chart creates a LoadBalancer service, named <release name>-octopus-deploy-polling-tentacles by default, which passes Tentacle traffic through to any node. Point your Polling Tentacles at this service’s address.
The chart’s per-node services and ingresses are still created, so existing Tentacles that poll every node continue to work. For all the chart’s settings, including load balancer annotations and supplying the connection string from your own secret, see the chart’s README.
Check the connection to Redis
After the nodes restart, send a GET request to /api on each node. The endpoint does not need an API key:
curl https://your-octopus-url/api/serverstatus/redisThe response tells you whether that node can use Redis:
| Property | Meaning when true |
|---|---|
IsEnabled |
A Redis connection string is configured, so the feature is on. |
IsConfigured |
Octopus could create a Redis connection from the connection string. |
IsReachable |
Octopus connected to Redis and ran a command. |
All three values should be true on every node. When monitoring Redis connection state, each node should be checked individually.
Point Polling Tentacles at the load balancer
Register each Polling Tentacle with the load balancer’s address as its only comms address. Use --server for the Octopus Web Portal address, and --server-comms-address for the Polling Tentacle load balancer:
tentacle register-with --server="https://your-octopus-url" --apiKey="API-YOUR-KEY" --comms-style="TentacleActive" --server-comms-address="https://your-polling-load-balancer:10943" --environment="Production" --role="web-server"Then restart the Tentacle:
tentacle service --restartTo point an existing Polling Tentacle at the load balancer:
-
Add the load balancer with the poll-server command:
Bashtentacle poll-server --server="https://your-octopus-url" --apiKey="API-YOUR-KEY" --server-comms-address="https://your-polling-load-balancer:10943"The Tentacle reuses the subscription ID it already has for your Octopus Server, so Octopus still sees it as the same Tentacle.
-
Remove the per-node entries with the
clear-trusted-serverscommand, keeping the load balancer:Bashtentacle clear-trusted-servers --keep="https://your-polling-load-balancer:10943"This removes all trusted servers whose addresses are not listed in
--keep. Each address must match the stored address exactly, so use the same scheme, host, and port you passed to--server-comms-address. For example,httpsdoes not match: / /your-polling-load-balancer https. If the Tentacle also trusts another Octopus Server, add that server’s address to: / /your-polling-load-balancer :10943 --keepas a comma-separated list.The
clear-trusted-serverscommand needs Tentacle 8.1.1713 or later. On an older Tentacle, upgrade it first. -
Restart the Tentacle:
Bashtentacle service --restart
Do not use configure --reset-trust for this. It removes the load balancer entry and the Tentacle’s subscription ID as well, so you would need to register the Tentacle again.
You can run the first step on its own and remove the per-node entries later. A Tentacle that polls the load balancer and the individual nodes simultaneously works because each request is still handled only once.
Tentacles that still poll every node individually keep working while multi-node support for Polling Tentacles is on, so that you can move them to the load balancer at your own pace.
Kubernetes agents
Kubernetes agents also poll for work and can use the load balancer the same way. When multi-node support for Polling Tentacles is enabled, the Kubernetes agent creation wizard asks for a single Communications URL instead of one per node. To learn how to set this URL and how to move an existing agent to the load balancer, see Kubernetes agent HA Cluster Support.
Turn off multi-node support for Polling Tentacles
To turn the feature off, clear the connection string from where it was set.
When set via the command line, unset it using the folling command on every node and restart them:
Octopus.Server.exe configure --instance="OctopusServer" --multiNodePollingTentaclesRedisConnectionString=If set by an environment variable, unset it and restart.
If set in the Helm chart, unset the connection string and set redis to false.
Before you turn the feature off, make sure every Polling Tentacle and Kubernetes agent polls each node individually, as described in Polling every node. Otherwise, tasks run by a node that a Tentacle is not polling will wait for that Tentacle until they time out.
Data storage
When multi-node support for Polling Tentacles is enabled, Octopus temporarily stores data in Redis and in the cluster shared directory.
Data in Redis
- Octopus stores all data under keys prefixed with
OctopusDeploy.:HalibutRedis : - Octopus encrypts data in Redis with your Master Key.
- Every key has a time to live (TTL), so Redis eventually removes it.
- For some keys, Redis requires the key to exist before a TTL can be set, so Octopus creates the key first and then sets its TTL. If an Octopus Server node goes offline between those steps, the key can stay in Redis without a TTL.
- You can restart Redis to remove these keys. Octopus treats the restart as a network error and retries the request to the Tentacle (Tentacle 7.0.0 or later), preventing deployments from failing.
Data in the cluster shared directory
- To keep Redis memory usage low, Octopus writes larger files, such as packages, to the cluster shared directory so every node can read them.
- Octopus automatically cleans up the data it stores here.
Troubleshooting
The configure command reports that the Redis connection string is not valid. Check the value follows the StackExchange.Redis connection string format. Wrap the whole value in quotes so your shell does not split it on commas.
IsReachable is false.
Check that the node can reach the Redis host and port through any firewalls, that the password is correct, and that ssl=true is set if your Redis requires TLS.
Tentacles fail to connect through the load balancer. Check the load balancer passes TCP traffic straight through on the Polling Tentacle port, and does not terminate TLS.
Deployments to Polling Tentacles fail or wait, only on some nodes.
Check every node is configured with the same Redis connection string, and that each node’s /api response is true for all three values.
You need to see where communication with a Tentacle is failing. Open the deployment target or worker and select Connectivity. It shows the recent communication logs for that Tentacle from every node.
Octopus Server fails to start because the cluster shared directory is not set. If multi-node support for Polling Tentacles is on, but the cluster shared directory is not configured, Octopus Server fails to start with this error:
Multi-node support for polling tentacles is enabled, but no cluster shared directory has been configured.Configure the cluster shared directory on storage that all nodes can access, as described in Turn on multi-node support for Polling Tentacles. Then start the node again.